If you're looking for a hairstyle that's both effortless and chic, beachy waves may be just what you need. This style is perfect for both casual and formal occasions and can be achieved with minimal effort. Here are seven benefits of having beachy waves in your hairstyle.
Showing posts with label hairstyle. Show all posts
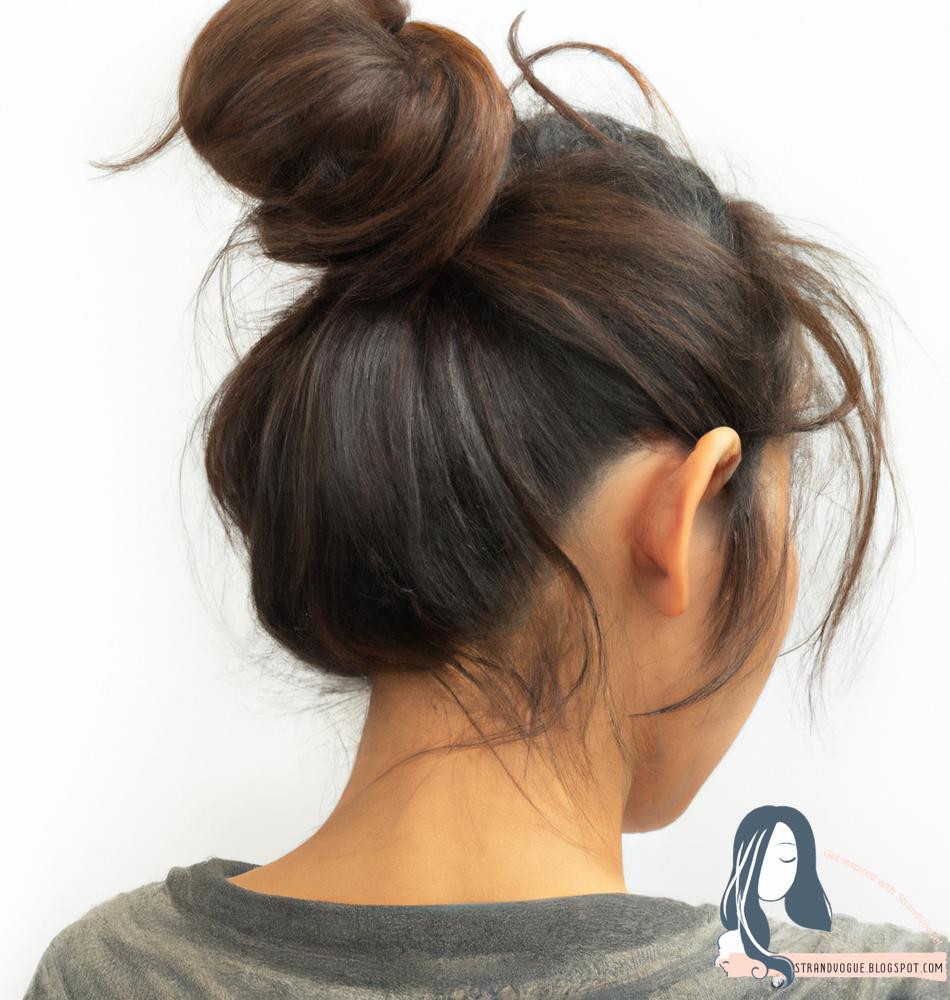
Messy Buns: A Timeless Hairstyle That Never Goes Out of Style
Introduction
When it comes to hairstyles, there are few that stand the test of time like the messy bun. This classic look has been a go-to for women of all ages and hair types for decades. From casual outings to formal events, the messy bun is a versatile hairstyle that can be dressed up or down depending on the occasion. In this article, we'll explore the history of the messy bun, how to create the perfect messy bun, and why it's a hairstyle that never goes out of style.
The History of the Messy Bun
The messy bun has humble beginnings, starting as a simple and practical hairstyle worn by ballerinas and gymnasts. It wasn't until the 1960s that the messy bun became a popular hairstyle for women outside of the dance world. The "undone" look of the messy bun fit in perfectly with the free-spirited and rebellious fashion trends of the time. From there, the messy bun continued to gain popularity in the 1970s and 80s, becoming a staple of the bohemian fashion movement.
Creating the Perfect Messy Bun
While the messy bun may look effortless, there are a few key steps to creating the perfect look. First, start with second-day hair or apply some dry shampoo to add texture and volume. Next, gather your hair into a high ponytail and secure it with an elastic band. Twist the ponytail and wrap it around the base, securing it with bobby pins as you go. Leave a few strands loose around your face for a more relaxed look. Finally, pull on the bun gently to create a more voluminous and messy look.
Why the Messy Bun is Timeless
There are several reasons why the messy bun has stood the test of time. First, it's a low-maintenance hairstyle that can be created quickly and easily. This makes it a great option for busy women who want to look put together without spending hours on their hair. Additionally, the messy bun is a versatile hairstyle that can be dressed up or down. It's a popular choice for both casual outings and formal events.
Another reason why the messy bun is timeless is that it looks great on all hair types and textures. Whether you have fine, straight hair or thick, curly hair, the messy bun can be adapted to suit your needs. It's also a great option for those with long hair who want to keep their hair out of their face while still looking stylish.
Conclusion
In conclusion, the messy bun is a timeless hairstyle that has been popular for decades. Its versatility, low-maintenance, and adaptability to all hair types make it a go-to hairstyle for women around the world. Whether you're heading to the gym or a formal event, the messy bun is a hairstyle that never goes out of style.
Messy Bun: The Ultimate Hairstyle for Busy Women
Introduction
As a busy woman, you likely have a lot on your plate. From work to family obligations to social events, your schedule is jam-packed. Amidst all of this chaos, it can be tough to find the time to style your hair. That's where the messy bun comes in. Not only is it quick and easy to create, but it's also incredibly versatile, making it the ultimate hairstyle for busy women.
How to Create a Messy Bun
Creating a messy bun is surprisingly simple. Here's how to do it:
1. Start by pulling your hair back into a high ponytail.
2. Twist the ponytail around itself to create a bun.
3. Use bobby pins to secure the bun in place.
4. Gently tug on the bun to loosen it up and create a messy, textured look.
5. Use hairspray or texturizing spray to hold the style in place.
That's it! In just a few minutes, you can have a chic and effortless hairstyle that's perfect for any occasion.
Messy Bun Variations
While the basic messy bun is a classic, there are plenty of variations you can try to mix things up. Here are a few ideas:
1. Low Messy Bun - Instead of starting with a high ponytail, create a low ponytail at the nape of your neck. Twist and pin the ponytail into a bun, then loosen it up for a messy look.
2. Braided Messy Bun - Before creating your bun, braid your ponytail for added texture and interest.
3. Half-Up Messy Bun - For a more casual look, try a half-up messy bun. Simply gather the top half of your hair (leaving the bottom half down), twist it into a bun, and secure it with pins.
Why the Messy Bun is Perfect for Busy Women
The messy bun is the ultimate hairstyle for busy women for several reasons:
1. It's Quick - As we mentioned earlier, creating a messy bun takes just a few minutes. That means you can have a stylish look without sacrificing precious time.
2. It's Versatile - The messy bun can be dressed up or down, making it perfect for a variety of occasions. Whether you're headed to work or a night out with friends, the messy bun has got you covered.
3. It's Low-Maintenance - Once your messy bun is in place, you don't have to worry about it for the rest of the day. It's a low-maintenance hairstyle that still looks great.
4. It's Comfortable - Unlike more structured hairstyles, the messy bun doesn't require any tight braids or hairpins that can cause discomfort. It's a comfortable choice that still looks chic.
5. It's on Trend - Messy buns are a popular trend right now, so you'll be right on-trend while also being practical.
Conclusion
The messy bun is the ultimate hairstyle for busy women. With its ease of creation, versatility, low-maintenance, comfort, and trendiness, it's no wonder that it's such a popular choice. Whether you're running errands or attending a fancy event, the messy bun is the perfect hairstyle to keep you looking stylish and put-together. So, give it a try and see how it can simplify your life!
Braids for Short Hair: 5 Fun and Creative Styles to Try
If you have short hair, you might think that braids are not an option for you. However, there are many braided hairstyles that work well with short hair. From simple and elegant, to bold and edgy, there are many styles to choose from.
Here are 5 fun and creative braided styles to try on your short hair:
The side crown braid is a beautiful and elegant style that works well with short hair. To achieve this look, start by parting your hair to one side. Then, take a small section of hair from the front of your head and braid it. Secure the braid with a bobby pin behind your ear. Repeat on the other side. Finally, connect the two braids at the back of your head with a small elastic band.
If you have a bob haircut, you can add some extra flair by adding a braid. To achieve this look, start by parting your hair in the center. Then, take a small section of hair from the front of your head and braid it. Secure the braid with a bobby pin behind your ear. Repeat on the other side. Finally, connect the two braids at the back of your head with a small elastic band.
If you have short hair, you can still create an updo with a french braid. To achieve this look, start by french braiding the top section of your hair. Secure the end of the braid with a small elastic band. Gather the remaining hair at the nape of your neck and twist it into a bun. Secure the bun with bobby pins.
The braided half-up style is a simple and easy-to-achieve look that works well with short hair. To achieve this look, start by taking a small section of hair from the front of your head and braiding it. Secure the braid with a bobby pin behind your ear. Repeat on the other side. Gather the remaining hair at the back of your head and tie it into a small ponytail.
The braided headband is a fun and playful style that works well with short hair. To achieve this look, start by taking a small section of hair from the front of your head and braiding it. Secure the braid with a bobby pin behind your ear. Repeat on the other side. Finally, connect the two braids at the back of your head with a small elastic band.
In conclusion, there are many braided hairstyles that work well with short hair. These 5 fun and creative styles are just a few examples. Don't be afraid to experiment with different braids and styles to find the perfect look for you.
Here are 5 fun and creative braided styles to try on your short hair:
1. Side Crown Braid
The side crown braid is a beautiful and elegant style that works well with short hair. To achieve this look, start by parting your hair to one side. Then, take a small section of hair from the front of your head and braid it. Secure the braid with a bobby pin behind your ear. Repeat on the other side. Finally, connect the two braids at the back of your head with a small elastic band.
2. Braided Bob
If you have a bob haircut, you can add some extra flair by adding a braid. To achieve this look, start by parting your hair in the center. Then, take a small section of hair from the front of your head and braid it. Secure the braid with a bobby pin behind your ear. Repeat on the other side. Finally, connect the two braids at the back of your head with a small elastic band.
3. French Braid Updo
If you have short hair, you can still create an updo with a french braid. To achieve this look, start by french braiding the top section of your hair. Secure the end of the braid with a small elastic band. Gather the remaining hair at the nape of your neck and twist it into a bun. Secure the bun with bobby pins.
4. Braided Half-Up Style
The braided half-up style is a simple and easy-to-achieve look that works well with short hair. To achieve this look, start by taking a small section of hair from the front of your head and braiding it. Secure the braid with a bobby pin behind your ear. Repeat on the other side. Gather the remaining hair at the back of your head and tie it into a small ponytail.
5. Braided Headband
The braided headband is a fun and playful style that works well with short hair. To achieve this look, start by taking a small section of hair from the front of your head and braiding it. Secure the braid with a bobby pin behind your ear. Repeat on the other side. Finally, connect the two braids at the back of your head with a small elastic band.
In conclusion, there are many braided hairstyles that work well with short hair. These 5 fun and creative styles are just a few examples. Don't be afraid to experiment with different braids and styles to find the perfect look for you.
7+ Bob Haircuts for Oval Faces That Highlight Your Features
Are you looking for a new hairstyle that will enhance your facial features? If you have an oval face, you're in luck! Oval faces are well-balanced and versatile, making them the perfect canvas for a variety of hairstyles. One of the most popular and flattering hairstyles for oval faces is the bob haircut. In this article, we will explore seven different bob haircuts that are perfect for oval faces.
The Classic Bob
The classic bob is timeless and never goes out of style. This haircut is perfect for oval faces because it accentuates the cheekbones and jawline. The length of the bob can vary, but it should end at or above the chin to create a flattering frame for the face.The Long Bob
The long bob, also known as the "lob," is a slightly longer version of the classic bob. This haircut is perfect for oval faces because it elongates the face and draws attention to the neck and collarbone. The length of the lob should end just above the shoulders for the most flattering look.The Inverted Bob
The inverted bob is a stylish and edgy haircut that is perfect for oval faces. This haircut features shorter layers in the back and longer layers in the front, creating a dramatic angle that highlights the cheekbones and jawline.The A-Line Bob
The A-line bob is a chic and modern haircut that works well with oval faces. This haircut is longer in the front and shorter in the back, creating a subtle angle that accentuates the face. The A-line bob can be worn straight or curled for a more playful look.The Blunt Bob
The blunt bob is a bold and sophisticated haircut that works well with oval faces. This haircut features straight, blunt ends that create a dramatic frame for the face. The length of the blunt bob can vary, but it should end at or above the chin for the most flattering look.The Shaggy Bob
The shaggy bob is a playful and youthful haircut that is perfect for oval faces. This haircut features choppy layers and textured ends that create a messy, tousled look. The shaggy bob can be worn straight or wavy for a more casual look.The Curly Bob
The curly bob is a fun and flirty haircut that works well with oval faces. This haircut features bouncy, voluminous curls that add texture and movement to the hair. The length of the curly bob can vary, but it should end at or above the chin to frame the face.In conclusion, if you have an oval face, there are many different bob haircuts that can enhance your features and create a flattering frame for your face. Whether you prefer a classic or edgy look, there is a bob haircut that will work for you. So, don't be afraid to experiment and try something new – you might just discover your new favorite hairstyle!The Ultimate Guide to French Braids: How to Do Them Yourself
If you're looking for a classic and elegant hairstyle, look no further than the French braid. This timeless look has been around for centuries and is still as popular today as it was then. The French braid is a versatile hairstyle that can be worn for any occasion, from a casual day out to a formal event. In this article, we'll show you how to create the perfect French braid, step by step.
Before you begin braiding, make sure your hair is clean and dry. Brush out any tangles or knots, and apply a small amount of hair product to help your hair stay in place. It's best to use a lightweight product that won't weigh your hair down or make it look oily.
To start the braid, divide your hair into three equal sections. Hold the left section in your left hand, the middle section in your right hand, and let the right section hang loose. Make sure each section is the same size; this will ensure that your braid is even and balanced.
To begin the braid, cross the left section over the middle section, so the left section becomes the new middle section. Then, cross the right section over the new middle section, so the right section becomes the new middle section. Repeat this process, crossing the left and right sections over the middle section, until you've braided to the end of your hair.
Once you've reached the end of your hair, secure the braid with a hair tie or clip. You can also use a decorative clip or bow to add some extra flair to your braid. If you have any loose strands or flyaways, use a small amount of hairspray or hair gel to smooth them down.
The French braid may take some practice to master, but don't get discouraged if it doesn't turn out perfectly on your first try. Keep practicing, and soon you'll be able to create beautiful French braids with ease.
In conclusion, the French braid is a classic and elegant hairstyle that can be worn for any occasion. By following these simple steps, you'll be able to create the perfect French braid in no time. Remember to start with clean, dry hair, divide your hair into three equal sections, and practice, practice, practice. With a little bit of patience and perseverance, you'll be able to create beautiful French braids that will turn heads wherever you go.
Step 1: Start with Clean, Dry Hair
Before you begin braiding, make sure your hair is clean and dry. Brush out any tangles or knots, and apply a small amount of hair product to help your hair stay in place. It's best to use a lightweight product that won't weigh your hair down or make it look oily.
Step 2: Divide Your Hair into Three Sections
To start the braid, divide your hair into three equal sections. Hold the left section in your left hand, the middle section in your right hand, and let the right section hang loose. Make sure each section is the same size; this will ensure that your braid is even and balanced.
Step 3: Begin Braiding
To begin the braid, cross the left section over the middle section, so the left section becomes the new middle section. Then, cross the right section over the new middle section, so the right section becomes the new middle section. Repeat this process, crossing the left and right sections over the middle section, until you've braided to the end of your hair.
Step 4: Secure the Braid
Once you've reached the end of your hair, secure the braid with a hair tie or clip. You can also use a decorative clip or bow to add some extra flair to your braid. If you have any loose strands or flyaways, use a small amount of hairspray or hair gel to smooth them down.
Step 5: Practice Makes Perfect
The French braid may take some practice to master, but don't get discouraged if it doesn't turn out perfectly on your first try. Keep practicing, and soon you'll be able to create beautiful French braids with ease.
In conclusion, the French braid is a classic and elegant hairstyle that can be worn for any occasion. By following these simple steps, you'll be able to create the perfect French braid in no time. Remember to start with clean, dry hair, divide your hair into three equal sections, and practice, practice, practice. With a little bit of patience and perseverance, you'll be able to create beautiful French braids that will turn heads wherever you go.
How to Master the French Twist: A Classic Hair Updo Tutorial
by: ideaparty No comments
categories: classic hairstyle, hair tutorial, hair updo, hair updos, hairstyle
Have you ever looked at someone with a French twist and thought, "I could never do that"? Well, think again! The French twist is a classic hair updo that is easier to achieve than you may think. With a little patience and practice, you can master this timeless hairstyle.
The first step in achieving the perfect French twist is to start with clean and dry hair. Wash your hair and allow it to air dry or blow dry it. If your hair is too clean and slippery, it may be difficult to hold the style. Therefore, it is best to skip the conditioner and apply some texturizing spray or dry shampoo to add some grip to your hair.
Brush your hair and create a low ponytail at the nape of your neck. Make sure it is secure with an elastic band, but not too tight. You can also use bobby pins to pin any flyaways in place.
Next, twist your ponytail upwards towards the crown of your head. Make sure it is tight and smooth. Keep twisting until you reach the top of your head.
Once you have twisted your ponytail, use bobby pins to secure it in place. Start at the top and insert the pins downwards, making sure they are hidden from view.
To finish off your French twist, you can add some hairspray or hair accessories such as a ribbon or a flower. This will give your hairstyle a touch of elegance and sophistication.
Practice makes perfect when it comes to mastering the French twist. Don't be discouraged if it doesn't turn out perfectly the first time. Keep practicing and soon you will be able to achieve this timeless hairstyle with ease.
Step 1: Start With Clean and Dry Hair
The first step in achieving the perfect French twist is to start with clean and dry hair. Wash your hair and allow it to air dry or blow dry it. If your hair is too clean and slippery, it may be difficult to hold the style. Therefore, it is best to skip the conditioner and apply some texturizing spray or dry shampoo to add some grip to your hair.
Step 2: Brush Your Hair and Create a Ponytail
Brush your hair and create a low ponytail at the nape of your neck. Make sure it is secure with an elastic band, but not too tight. You can also use bobby pins to pin any flyaways in place.
Step 3: Twist Your Ponytail
Next, twist your ponytail upwards towards the crown of your head. Make sure it is tight and smooth. Keep twisting until you reach the top of your head.
Step 4: Secure the Twist
Once you have twisted your ponytail, use bobby pins to secure it in place. Start at the top and insert the pins downwards, making sure they are hidden from view.
Step 5: Add Some Finishing Touches
To finish off your French twist, you can add some hairspray or hair accessories such as a ribbon or a flower. This will give your hairstyle a touch of elegance and sophistication.
Practice makes perfect when it comes to mastering the French twist. Don't be discouraged if it doesn't turn out perfectly the first time. Keep practicing and soon you will be able to achieve this timeless hairstyle with ease.
The Messy Bun vs. The Sleek Bun: Which is Right for You?
by: ideaparty No comments
categories: hair accessories, hair care, hair styling, hairstyle, messy bun
When it comes to styling your hair, there are a lot of options available. Two popular options are the messy bun and the sleek bun. Both styles have their advantages and disadvantages, and the one that's right for you will depend on your personal preferences and the occasion.
The messy bun is a popular hairstyle that's easy to achieve and perfect for casual occasions. It's a great option for those who don't want to spend a lot of time styling their hair. The messy bun is achieved by pulling your hair into a bun, but leaving some strands loose for a relaxed look. This style can be worn high or low on the head, and it's perfect for those with medium to long hair.
One advantage of the messy bun is that it's versatile. You can wear it to the gym, to work, or out with friends. It's a great option for those who want a hairstyle that's easy to maintain throughout the day. Additionally, the messy bun can be dressed up or down depending on the occasion. You can add a headband or hair accessories for a more polished look.
However, the messy bun does have some disadvantages. It may not be appropriate for formal occasions or professional settings. Additionally, the loose strands can make the hairstyle look messy or unkempt, which may not be desirable for some people.
The sleek bun is a more polished version of the messy bun. It's achieved by pulling your hair into a tight bun, and using gel or hairspray to smooth down any flyaways. This style is great for formal occasions or professional settings, as it looks neat and put-together.
One advantage of the sleek bun is that it's sophisticated and elegant. It's a great option for those who want a polished look without spending a lot of time styling their hair. Additionally, the sleek bun can be worn high or low on the head, and it's perfect for those with medium to long hair.
However, the sleek bun does have some disadvantages. It may not be appropriate for casual occasions or those who prefer a more relaxed look. Additionally, the tightness of the bun can cause discomfort or headaches for some people.
Deciding between the messy bun and the sleek bun will depend on your personal preferences and the occasion. If you're looking for a hairstyle that's easy to achieve and can be worn in a variety of settings, the messy bun may be the right choice for you. However, if you're attending a formal occasion or want a more polished look, the sleek bun may be the better option.
Ultimately, the decision comes down to what makes you feel confident and comfortable. Try out both styles and see which one you prefer. You may also want to consider the length of your hair, as the messy bun may not be practical for those with short hair.
In conclusion, both the messy bun and the sleek bun are great options for styling your hair. Each style has its advantages and disadvantages, and the one that's right for you will depend on your personal preferences and the occasion. With a little experimentation, you'll be able to find the perfect bun for any occasion.
The Messy Bun
The messy bun is a popular hairstyle that's easy to achieve and perfect for casual occasions. It's a great option for those who don't want to spend a lot of time styling their hair. The messy bun is achieved by pulling your hair into a bun, but leaving some strands loose for a relaxed look. This style can be worn high or low on the head, and it's perfect for those with medium to long hair.
One advantage of the messy bun is that it's versatile. You can wear it to the gym, to work, or out with friends. It's a great option for those who want a hairstyle that's easy to maintain throughout the day. Additionally, the messy bun can be dressed up or down depending on the occasion. You can add a headband or hair accessories for a more polished look.
However, the messy bun does have some disadvantages. It may not be appropriate for formal occasions or professional settings. Additionally, the loose strands can make the hairstyle look messy or unkempt, which may not be desirable for some people.
The Sleek Bun
The sleek bun is a more polished version of the messy bun. It's achieved by pulling your hair into a tight bun, and using gel or hairspray to smooth down any flyaways. This style is great for formal occasions or professional settings, as it looks neat and put-together.
One advantage of the sleek bun is that it's sophisticated and elegant. It's a great option for those who want a polished look without spending a lot of time styling their hair. Additionally, the sleek bun can be worn high or low on the head, and it's perfect for those with medium to long hair.
However, the sleek bun does have some disadvantages. It may not be appropriate for casual occasions or those who prefer a more relaxed look. Additionally, the tightness of the bun can cause discomfort or headaches for some people.
Which is Right for You?
Deciding between the messy bun and the sleek bun will depend on your personal preferences and the occasion. If you're looking for a hairstyle that's easy to achieve and can be worn in a variety of settings, the messy bun may be the right choice for you. However, if you're attending a formal occasion or want a more polished look, the sleek bun may be the better option.
Ultimately, the decision comes down to what makes you feel confident and comfortable. Try out both styles and see which one you prefer. You may also want to consider the length of your hair, as the messy bun may not be practical for those with short hair.
In conclusion, both the messy bun and the sleek bun are great options for styling your hair. Each style has its advantages and disadvantages, and the one that's right for you will depend on your personal preferences and the occasion. With a little experimentation, you'll be able to find the perfect bun for any occasion.
The Secret to Keeping Your Braids Looking Fresh and Frizz-Free
Braids are a popular hairstyle choice for many people. They can be worn in a variety of styles and can last for weeks. However, keeping your braids looking fresh and frizz-free can be a challenge. In this article, we will share some tips on how to keep your braids looking great for longer.
Keeping your hair clean is essential for keeping your braids looking fresh. Dirt and oil can build up on your scalp, causing your braids to become itchy and uncomfortable. To keep your hair clean, you can use a dry shampoo or a cleansing spray designed for braids. These products can help to remove dirt and oil without disturbing your braids.
Moisturizing your scalp is another important step in keeping your braids looking fresh. A dry scalp can lead to itching and flaking, which can cause your braids to look dull and lifeless. To moisturize your scalp, you can use a scalp oil or a leave-in conditioner. These products can help to soothe and hydrate your scalp, keeping your braids looking shiny and healthy.
Sleeping on a cotton pillowcase can cause your braids to become frizzy and tangled. Cotton can absorb moisture from your hair, leaving it dry and brittle. To keep your braids looking smooth and frizz-free, you can switch to a satin pillowcase. Satin is a smoother material that doesn't absorb moisture as much as cotton, which can help to keep your braids looking fresh.
Protecting your braids is key to keeping them looking fresh. If you're going to be outside in the sun, you can wear a hat or a scarf to protect your braids from UV damage. If you're going to be swimming, you can wear a swim cap to protect your braids from chlorine and saltwater. You can also use a hair tie to keep your braids in place when you're exercising or doing other physical activities.
While braids can last for weeks, leaving them in for too long can cause damage to your hair. Your hair needs to breathe, and leaving your braids in for too long can cause your hair to become dry and brittle. To keep your hair healthy, it's best to take your braids out after four to six weeks.
In conclusion, keeping your braids looking fresh and frizz-free requires some effort, but it's worth it. By following these tips, you can keep your braids looking great for longer and avoid damage to your hair. Remember to keep your hair clean, moisturize your scalp, use a satin pillowcase, protect your braids, and don't leave them in too long.
1. Keep Your Hair Clean
Keeping your hair clean is essential for keeping your braids looking fresh. Dirt and oil can build up on your scalp, causing your braids to become itchy and uncomfortable. To keep your hair clean, you can use a dry shampoo or a cleansing spray designed for braids. These products can help to remove dirt and oil without disturbing your braids.
2. Moisturize Your Scalp
Moisturizing your scalp is another important step in keeping your braids looking fresh. A dry scalp can lead to itching and flaking, which can cause your braids to look dull and lifeless. To moisturize your scalp, you can use a scalp oil or a leave-in conditioner. These products can help to soothe and hydrate your scalp, keeping your braids looking shiny and healthy.
3. Use a Satin Pillowcase
Sleeping on a cotton pillowcase can cause your braids to become frizzy and tangled. Cotton can absorb moisture from your hair, leaving it dry and brittle. To keep your braids looking smooth and frizz-free, you can switch to a satin pillowcase. Satin is a smoother material that doesn't absorb moisture as much as cotton, which can help to keep your braids looking fresh.
4. Protect Your Braids
Protecting your braids is key to keeping them looking fresh. If you're going to be outside in the sun, you can wear a hat or a scarf to protect your braids from UV damage. If you're going to be swimming, you can wear a swim cap to protect your braids from chlorine and saltwater. You can also use a hair tie to keep your braids in place when you're exercising or doing other physical activities.
5. Don't Leave Your Braids in Too Long
While braids can last for weeks, leaving them in for too long can cause damage to your hair. Your hair needs to breathe, and leaving your braids in for too long can cause your hair to become dry and brittle. To keep your hair healthy, it's best to take your braids out after four to six weeks.
In conclusion, keeping your braids looking fresh and frizz-free requires some effort, but it's worth it. By following these tips, you can keep your braids looking great for longer and avoid damage to your hair. Remember to keep your hair clean, moisturize your scalp, use a satin pillowcase, protect your braids, and don't leave them in too long.
How to Create a Perfect Ponytail: Tips and Tricks
by: ideaparty No comments
categories: hair care, hair styling, hairstyle, perfect ponytail, ponytail hairstyles
If you are looking for a simple yet stylish hairstyle that can be done in minutes, then a ponytail is the way to go. The good news is that there are various ways to create a perfect ponytail, whether you have long or short hair. In this article, we will guide you through the steps on how to create a perfect ponytail, as well as provide you with some tips and tricks to make your ponytail look flawless.
Here are the steps to follow to create the perfect ponytail:
1. Start by brushing your hair to remove any tangles.
2. Gather your hair using a brush or your fingers and tie it with a hair elastic.
3. For a sleek look, use a toothbrush or a mascara wand to smooth any bumps or flyaways.
4. If you want to add more volume to your ponytail, tease the hair at the crown of your head before tying it.
5. To create a more polished look, take a small section of hair from the underside of your ponytail and wrap it around the hair elastic, securing it with a bobby pin.
6. Finish off your ponytail with some hairspray to keep it in place.
Here are some tips and tricks to make your ponytail look perfect:
1. Use a hair elastic that matches your hair color to make it less noticeable.
2. If you have thin hair, create the illusion of volume by teasing the hair at the crown of your head.
3. To create a more textured look, use a curling iron to curl your hair before tying it into a ponytail.
4. If you want to add some length to your ponytail, use a hair extension.
5. For a sporty and casual look, create a messy ponytail by tying your hair with your fingers instead of a brush.
In conclusion, creating a perfect ponytail is easy and can be done in minutes. The key is to follow the steps and add some of the tips and tricks mentioned above to make your ponytail look flawless. Whether you are going for a casual or a more polished look, a ponytail is a hairstyle that can never go wrong. So go ahead and give it a try!
Steps to Create a Perfect Ponytail
Here are the steps to follow to create the perfect ponytail:
1. Start by brushing your hair to remove any tangles.
2. Gather your hair using a brush or your fingers and tie it with a hair elastic.
3. For a sleek look, use a toothbrush or a mascara wand to smooth any bumps or flyaways.
4. If you want to add more volume to your ponytail, tease the hair at the crown of your head before tying it.
5. To create a more polished look, take a small section of hair from the underside of your ponytail and wrap it around the hair elastic, securing it with a bobby pin.
6. Finish off your ponytail with some hairspray to keep it in place.
Tips and Tricks for a Perfect Ponytail
Here are some tips and tricks to make your ponytail look perfect:
1. Use a hair elastic that matches your hair color to make it less noticeable.
2. If you have thin hair, create the illusion of volume by teasing the hair at the crown of your head.
3. To create a more textured look, use a curling iron to curl your hair before tying it into a ponytail.
4. If you want to add some length to your ponytail, use a hair extension.
5. For a sporty and casual look, create a messy ponytail by tying your hair with your fingers instead of a brush.
Conclusion
In conclusion, creating a perfect ponytail is easy and can be done in minutes. The key is to follow the steps and add some of the tips and tricks mentioned above to make your ponytail look flawless. Whether you are going for a casual or a more polished look, a ponytail is a hairstyle that can never go wrong. So go ahead and give it a try!
Subscribe to:
Posts (Atom)